
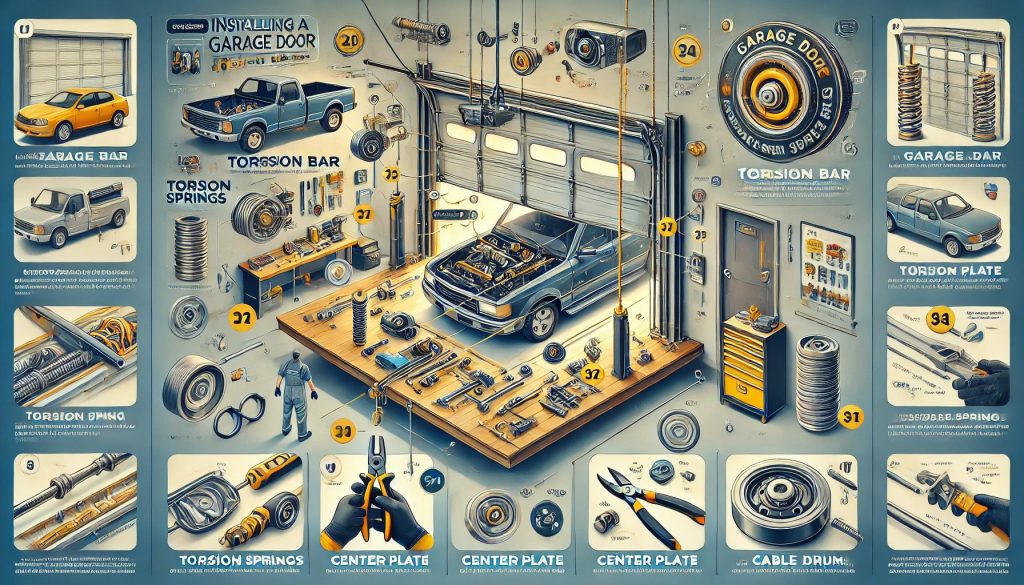
Installing a garage door torsion bar center plate is a critical aspect of ensuring your garage door operates safely and efficiently. This process requires precision, proper tools, and strict adherence to safety guidelines to avoid accidents or damage to the door system. Whether you’re replacing torsion springs, adjusting spring tension, or installing a brand-new system, this guide will provide detailed instructions to help you complete the job successfully.
What is a Garage Door Torsion Bar?
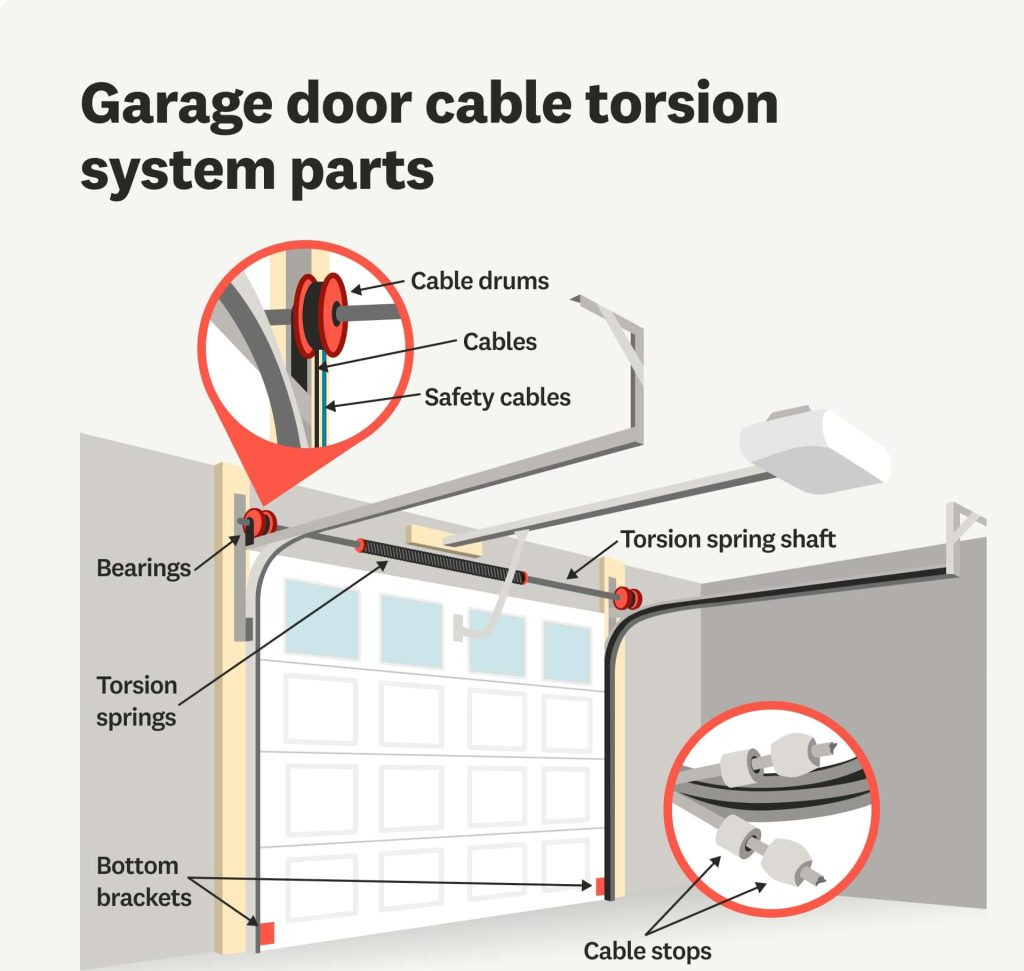
The torsion bar is a fundamental component of the garage door system. It’s a sturdy metal rod located at the top of the door, running horizontally across the door’s width. The primary function of the torsion bar is to hold the torsion springs, which are responsible for storing and releasing mechanical energy to lift or lower the garage door smoothly.
The torsion bar works in tandem with the springs, cable drums, and rollers to distribute the door’s weight evenly. Without the torsion bar, the door could become unbalanced, leading to jerky movements, excessive strain on the motor (if automated), and potential safety hazards.
The Importance of Centering the Torsion Bar
Why does the garage door torsion bar need to be centered? The answer lies in maintaining balance and ensuring proper distribution of tension. When the torsion bar is centered, the springs apply equal force to both sides of the door. This balance prevents misalignment, which could cause the door to bind, warp, or fail altogether.
An uncentered torsion bar can lead to:
- Uneven wear on the springs.
- Difficulty in opening or closing the door.
- Additional strain on the garage door opener.
Why the Garage Door Torsion Bar Should Be Centered
Centering the torsion bar is more than just a technical requirement; it’s a safety measure. A misaligned torsion bar can increase the likelihood of springs snapping or the door becoming stuck. Both scenarios can be dangerous and costly. Proper centering also ensures that the door operates quietly, reducing wear and tear on the system over time.
Essential Tools for Garage Door Torsion Bar Installation
Before beginning the installation, gather the necessary tools to ensure a seamless and efficient process. Here’s a list of what you’ll need:
- Garage door spring tools like winding bars.
- A 7/16″ socket wrench.
- Two 9/16″ box wrenches.
- Locking pliers to secure components in place.
- A drill with 3/16″ pilot drill bits.
- Tape measure for precise alignment.
- Safety goggles to protect your eyes.
These tools will not only simplify the process but also help you maintain a high level of safety throughout the installation.
Garage Door Spring Tools You’ll Need
When working with torsion bars, springs, and center plates, having the right garage door spring tools is vital. Using incorrect tools not only complicates the process but also increases the risk of injury or damaging the garage door system. Below is a list of essential tools you should gather before starting the installation:
- Garage Spring Winding Bars: These are specifically designed to wind and unwind torsion springs safely. Never use screwdrivers or other substitutes.
- Locking Pliers: These help secure the torsion bar in place while adjusting or installing springs.
- 7/16″ Socket Wrench: Required to tighten bolts and screws securely.
- 9/16″ Box Wrenches: Essential for adjusting the tension of the springs.
- Drill and Bits: Use a 3/16″ drill bit to create pilot holes for attaching the center plate.
- Safety Gear: Protective gloves and safety goggles are non-negotiable to protect yourself from accidental injuries.
What is a Center Plate and Why is It Important?
The center plate is a metal bracket located at the midpoint of the torsion bar. It holds the torsion springs in place and resists the counter-torque produced as the springs are wound or unwound. Without a sturdy and properly installed center plate, the torsion springs cannot function correctly.
Key functions of the center plate include:
- Anchoring the torsion bar.
- Distributing spring tension evenly.
- Preventing misalignment and wobbling of the torsion system.
Step-by-Step Guide to Garage Door Torsion Bar Center Plate Install
Step 1: Prepare the Garage Door
Start by locking the garage door in the down position using locking pliers or the door’s built-in lock. This step is critical to prevent accidental movement during the installation process.
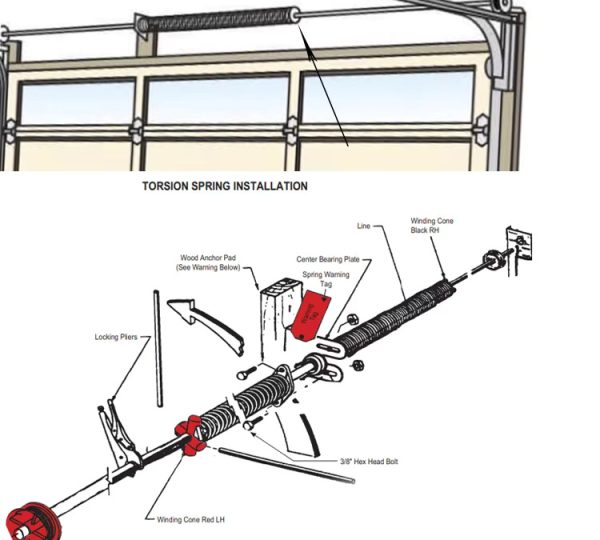
Step 2: Attach the Center Plate
Secure the center plate to the wooden anchor pad on the garage wall. Drill pilot holes using a 3/16″ drill bit before driving in screws to ensure a tight and secure fit. Use red-coated screws, which are designed for this high-tension application.
Step 3: Install the Torsion Springs
Slide the torsion springs onto the torsion bar. Ensure the spring with the red winding cone is on the left side and the black winding cone spring is on the right side. This color coding helps identify the correct wind direction.
Step 4: Attach the Cable Drums
Fix the cable drums to the ends of the torsion bar. The red drum goes on the left, and the black drum on the right. Tighten the set screws securely to prevent slipping.
Step 5: Wind the Torsion Springs
Using garage spring winding bars, wind the springs carefully. Follow the garage door spring winding chart to determine the exact number of turns needed based on the door’s height and weight. This step requires precision to avoid over- or under-tensioning the springs.
Step 6: Test the Door
Slowly lift the garage door halfway to check for proper alignment and balance. If the door feels heavy or uneven, adjust the tension by adding or removing turns from the torsion springs.
How to Replace a Garage Door Torsion Spring
If your torsion springs are damaged or worn out, replacement is necessary. Begin by unwinding the old springs using winding bars to release tension safely. Remove the damaged springs and slide new ones onto the torsion bar. Ensure proper placement of the winding cones and tighten the set screws before winding the springs.
How to Determine Garage Door Spring Wind Direction
Determining the wind direction of torsion springs is essential for correct installation. Springs with red winding cones are wound clockwise and installed on the left side, while springs with black winding cones are wound counterclockwise and installed on the right side.
The Role of Garage Door Torsion Bar Center Plate in Spring Balance
The center plate plays a vital role in ensuring the springs remain balanced. It anchors the torsion bar to the garage wall, preventing excessive wobbling and maintaining consistent spring tension across the door.
How to Wind a Double Spring Garage Door
Winding a double spring garage door requires extra care because two springs must work in tandem for proper balance and functionality. Follow these steps for accurate winding:
- Identify the Springs: Confirm which side has the red winding cone (left) and the black winding cone (right).
- Secure the Door: Lock the door in the down position using locking pliers or clamps.
- Insert Winding Bars: Insert the first winding bar into the winding cone. Rotate it in the direction of the spring’s tail to increase tension.
- Count the Turns: Refer to the garage door spring winding chart to determine the number of turns needed for your door’s height and weight.
- Repeat for the Second Spring: Perform the same steps for the second spring, ensuring both are wound to the exact same tension to avoid imbalance.
- Test the Door: Slowly lift the door halfway to ensure smooth movement and proper balance.
Understanding Garage Door Spring Tension
Garage door spring tension refers to the amount of energy stored in the torsion springs, which is used to lift the heavy garage door. Proper tension is crucial for the smooth operation of the door. If the tension is too low, the door will feel heavy and may not stay open. If it’s too high, the door could slam shut, damaging its components.
How to Check Spring Tension
- Visual Check: Look for any uneven gaps between the spring coils.
- Door Movement: A well-balanced door should stay in place when lifted halfway.
- Test by Hand: Disconnect the door opener and manually lift the door. If it feels heavy, the springs need more tension.
By understanding spring tension, you can prevent issues like excessive wear on the garage door torsion bar or opener.
Safety Tips: Never Adjust Torsion Springs with the Door Down
Adjusting torsion springs with the door down is extremely dangerous due to the high tension stored in the springs. Always ensure the door is locked in the open position and use proper tools like garage door spring winding bars to make adjustments safely.
How to Tighten Garage Door Torsion Spring Safely
If your garage door feels heavy or struggles to stay open, it’s time to tighten the torsion spring. Here’s how to do it safely:
- Lock the Door: Secure the door in the down position with locking pliers to prevent accidental movement.
- Insert Winding Bars: Place the first winding bar into the winding cone, ensuring a firm grip.
- Tighten the Spring: Rotate the winding cone in 1/4-turn increments. Be careful not to over-tighten.
- Count the Turns: Use a garage door spring winding chart to match the number of turns to your door’s specifications.
- Secure the Spring: Tighten the set screws on the winding cone to hold the spring in place.
- Test the Door: Slowly raise and lower the door to ensure it operates smoothly.
Safety Tip: Never adjust torsion springs with the door down, as the tension stored in the springs can cause injuries.
Installing Garage Door Torsion Springs the Right Way
Proper installation of torsion springs ensures your garage door functions smoothly and safely. Here are the best practices:
- Use the Right Springs: Ensure the springs match the door’s weight and size. Use a garage door torsion spring chart for guidance.
- Secure the Springs Properly: Attach the springs with the red winding cone on the left and the black on the right.
- Tighten Gradually: Wind the springs 1/4 turn at a time using garage spring winding bars.
- Balance the Door: After winding the springs, check if the door remains stable when lifted halfway.
Avoid using makeshift tools or skipping safety checks to ensure a successful installation.
Common Mistakes to Avoid When Installing a Garage Door Torsion Bar Center Plate
- Skipping Safety Measures: Never start without wearing safety goggles or locking the door.
- Using Improper Tools: Screwdrivers are not substitutes for winding bars.
- Incorrect Spring Placement: Misplacing the red and black winding cones leads to improper functionality.
- Neglecting Spring Tension Adjustments: Proper tension ensures smooth door operation.
Garage Door Torsion Bar Center Plate Maintenance Tips
Proper maintenance of the garage door torsion bar center plate can extend its lifespan and prevent costly repairs. Here are some tips:
- Inspect for Damage: Check the center plate for cracks, rust, or loose screws.
- Tighten Screws Regularly: Ensure the fasteners are secure to avoid wobbling.
- Lubricate Moving Parts: Use a high-quality lubricant to reduce friction on the center plate and torsion bar.
- Clean Debris: Remove dust and debris from the center plate to prevent wear.
Performing these simple maintenance steps regularly will keep your garage door torsion bar center plate in top condition.
How to Adjust Springs on a Garage Door
Adjusting springs on a garage door is essential for maintaining balance and smooth operation. Here’s a quick guide:
- Identify the Issue: If the door feels heavy, you may need to increase tension. If it slams shut, reduce tension.
- Lock the Door: Secure the door in the down position with clamps or locking pliers.
- Use Winding Bars: Insert the winding bars into the winding cone to make adjustments.
- Turn in 1/4 Increments: Add or remove tension gradually, checking the door’s movement after each adjustment.
Garage Door Spring Tension Chart: Understanding the Numbers
A garage door spring tension chart helps determine the number of turns needed to wind torsion springs. The chart factors in the height and weight of the door, ensuring precise adjustments. For example:
|
Door Height (ft) |
Spring Turns |
|
7 |
7 1/2 |
| 8 |
8 1/2 |
Using this chart ensures your springs are wound correctly, reducing the risk of imbalance.
Signs of a Faulty Garage Door Torsion Bar
A faulty garage door torsion bar can compromise the functionality and safety of your garage door. Look out for these warning signs:
- Unusual Noises: Grinding or squeaking sounds may indicate misalignment.
- Uneven Door Movement: If one side of the door moves faster than the other, the torsion bar could be damaged.
- Visible Damage: Check for bends, rust, or cracks in the bar.
- Excessive Wear on Springs: Faulty torsion bars can cause uneven stress on the springs.
If you notice these signs, address the issue promptly to avoid further damage.
Conclusion: The Value of Proper Garage Door Torsion Bar Center Plate Installation
The proper installation of a garage door torsion bar center plate is crucial for the safety and efficiency of your garage door system. By following this guide, using the right tools, and adhering to safety protocols, you can ensure a smooth and successful installation. If you’re ever in doubt, consult a professional to avoid unnecessary risks or damage.
FAQs About Garage Door Torsion Bar Installation
How do I adjust garage door springs correctly?
Use winding bars to add or remove tension in 1/4-turn increments.
Does the torsion spring bracket need to be centered?
Yes, centering ensures balanced spring tension and door operation.
How can I determine the wind direction of a spring?
Check the color coding: red for left-side winding, black for right-side winding.
What is a garage door spring tension chart used for?
It provides the correct number of turns required to wind the springs based on door size and weight.
Why is it unsafe to adjust torsion springs with the door down?
The tension can cause the spring to snap, leading to serious injuries.
What tools are essential for replacing torsion springs?
You’ll need winding bars, a socket wrench, and locking pliers.


You have mentioned very interesting points! ps nice website .
Parents love the Dreamy Moon Stars Wall Mural from Wallmotif, featuring a soft purple sky filled with twinkling stars and clouds for a calming bedtime vibe.